# Displaying Nested Event Data from JSON
In the previous tutorial, you displayed device information in a table. In this tutorial, you will work with nested JSON data by displaying the security events associated with each device.
The JSON file contains devices, and each device contains its own list of events.
---
## Understanding the JSON Structure
The JSON file contains:
```text id="xtom1s"
Home
└ Devices
└ Events
```
Example:
```json id="g5ljhj"
{
"deviceId": "CAM-01",
"events": [
{
"eventType": "motion_detected"
}
]
}
```
To display the events, we need to loop through:
1. The devices
2. The events within each device
---
## Create an Events Table
Open:
```text id="x6y2qy"
script.js
```
Replace the previous code with:
```javascript id="s87r9y"
fetch("smart_security_data.json")
.then(response => response.json())
.then(data => {
let html = `
Security Events
| Device ID |
Event Type |
Severity |
`;
data.devices.forEach(device => {
device.events.forEach(event => {
html += `
| ${device.deviceId} |
${event.eventType} |
${event.severity} |
`;
});
});
html += "
";
document.getElementById("output").innerHTML = html;
});
```
---
## View the Results
Open:
```text id="nmb2d0"
http://localhost/json-demo/
```
You should see a table similar to:
| Device ID | Event Type | Severity |
| --------- | --------------------- | -------- |
| CAM-01 | motion_detected | high |
| CAM-01 | remote_access_attempt | critical |
| LOCK-02 | unlock_attempt | medium |
## Add Additional Event Information
The JSON file contains more information about each event.
Each event includes:
```text id="c4vdvx"
timestamp
eventType
dataTransmitted
severity
accessResult
```
Update the table headings:
```javascript id="vkp5wz"
| Device ID |
Timestamp |
Event Type |
Severity |
Access Result |
```
---
## Update the Table Rows
Replace the existing row code with:
```javascript id="fphmdh"
html += `
| ${device.deviceId} |
${event.timestamp} |
${event.eventType} |
${event.severity} |
${event.accessResult} |
`;
```
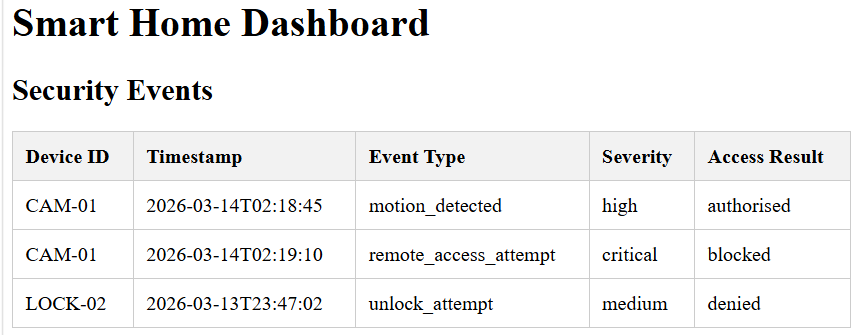
Refresh the page.
The table should now display more detailed event information.
[](https://mr.napper.au/uploads/images/gallery/2026-06/image-1780917222478.png)
## Display the Device Type
Sometimes multiple devices may generate events.
Add another column heading:
```javascript id="o3ijwv"
Device Type |
```
Update the row:
```javascript id="3lhhqa"
${device.deviceType} |
```
Your table will now identify which type of device generated each event.
---
## Complete JavaScript File
```javascript id="r0aj72"
fetch("smart_security_data.json")
.then(response => response.json())
.then(data => {
let html = `
Security Events
| Device ID |
Device Type |
Timestamp |
Event Type |
Severity |
Access Result |
`;
data.devices.forEach(device => {
device.events.forEach(event => {
html += `
| ${device.deviceId} |
${device.deviceType} |
${event.timestamp} |
${event.eventType} |
${event.severity} |
${event.accessResult} |
`;
});
});
html += "
";
document.getElementById("output").innerHTML = html;
});
```
---
## What Happened?
In the previous tutorial, you looped through a single array:
```javascript id="n1aqsy"
data.devices
```
In this tutorial, you looped through:
```javascript id="rjlwmz"
data.devices
```
and then:
```javascript id="0xkbxw"
device.events
```
This is known as a nested loop and is commonly used when working with JSON files and APIs.
You have successfully displayed nested JSON data in a table.
Next tutorial: **Creating a Security Dashboard from JSON Data**.