Working with JSON Data in JavaScript
- Loading JSON Data with JavaScript
- Displaying JSON Data in a Table
- Displaying Nested Event Data from JSON
- Creating a Security Dashboard from JSON Data
Loading JSON Data with JavaScript
In this tutorial, you will load data from a JSON file and display it on a webpage using JavaScript.
The JSON file contains information about a smart home, including devices and security events.
Create the Project Files
Create a new folder called:
json-demo
Inside the folder create:
index.html
smart_security_data.json
Copy the JSON file into the project folder.
Your folder structure should look like:
json-demo
├── index.html
└── smart_security_data.json
Create the HTML Page
Open:
index.html
Add the following code:
<!DOCTYPE html>
<html>
<head>
    <title>JSON Demo</title>
</head>
<body>

<h1>Smart Home Dashboard</h1>

<div id="output"></div>

<script src="script.js"></script>

</body>
</html>
Save the file.
Create the JavaScript File
Create a new file called:
script.js
Your folder should now look like:
json-demo
├── index.html
├── script.js
└── smart_security_data.json
Load the JSON File
Open:
script.js
Add:
fetch("smart_security_data.json")
    .then(response => response.json())
    .then(data => {

        console.log(data);

    });
Save the file.
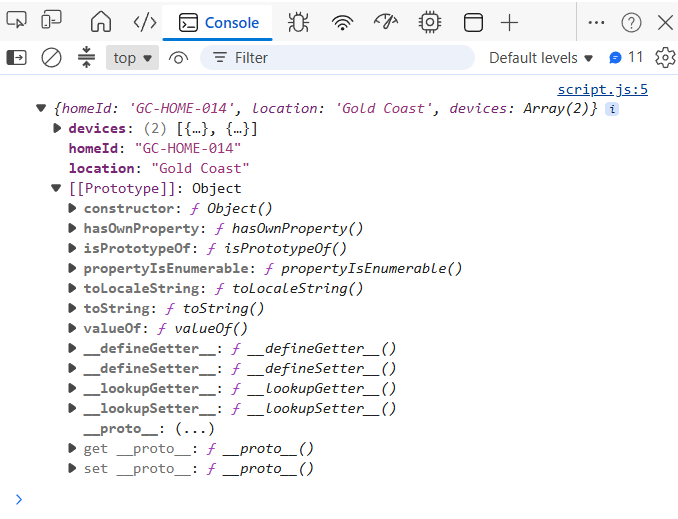
This code loads the JSON file and converts it into a JavaScript object.
Open Developer Tools
Open:
index.html
in your browser.
Press:
F12
and select the Console tab.
You should see the JSON data displayed.
Display the Home Information
Replace the contents of:
.then(data => {

});
with:
.then(data => {

    document.getElementById("output").innerHTML = `
        <p><strong>Home ID:</strong> ${data.homeId}</p>
        <p><strong>Location:</strong> ${data.location}</p>
    `;

});
Save the file.
Refresh the page.
You should now see:
Home ID: GC-HOME-014
Location: Gold Coast
Display the Devices
Update the code:
fetch("smart_security_data.json")
    .then(response => response.json())
    .then(data => {

        let html = `
            <p><strong>Home ID:</strong> ${data.homeId}</p>
            <p><strong>Location:</strong> ${data.location}</p>

            <h2>Devices</h2>
            <ul>
        `;

        data.devices.forEach(device => {

            html += `
                <li>
                    ${device.deviceId}
                    (${device.deviceType})
                </li>
            `;

        });

        html += "</ul>";

        document.getElementById("output").innerHTML = html;

    });
Refresh the page.
You should now see:
Home ID: GC-HOME-014
Location: Gold Coast

Devices

CAM-01 (Security Camera)
LOCK-02 (Smart Door Lock)
Complete JavaScript File
fetch("smart_security_data.json")
    .then(response => response.json())
    .then(data => {

        let html = `
            <p><strong>Home ID:</strong> ${data.homeId}</p>
            <p><strong>Location:</strong> ${data.location}</p>

            <h2>Devices</h2>
            <ul>
        `;

        data.devices.forEach(device => {

            html += `
                <li>
                    ${device.deviceId}
                    (${device.deviceType})
                </li>
            `;

        });

        html += "</ul>";

        document.getElementById("output").innerHTML = html;

    });
You have successfully loaded a JSON file and displayed data using JavaScript.
Next tutorial: Displaying JSON Data in a Table.
Displaying JSON Data in a Table
In the previous tutorial, you loaded a JSON file and displayed basic information about the smart home. In this tutorial, you will display the device data in an HTML table using JavaScript.
Current Project Structure
Your project should contain:
json-demo
├── index.html
├── script.js
└── smart_security_data.json
Create a Table Container
Open:
index.html
Update the page so it contains:
<!DOCTYPE html>
<html>
<head>
    <title>JSON Demo</title>
</head>
<body>

<h1>Smart Home Dashboard</h1>

<div id="output"></div>

<script src="script.js"></script>

</body>
</html>
The table will be generated inside the output div.
Create the Table Structure
Open:
script.js
Replace the previous code with:
fetch("smart_security_data.json")
    .then(response => response.json())
    .then(data => {

        let html = `
            <h2>Devices</h2>

            <table border="1">

                <tr>
                    <th>Device ID</th>
                    <th>Device Type</th>
                    <th>Room</th>
                </tr>
        `;

        data.devices.forEach(device => {

            html += `
                <tr>
                    <td>${device.deviceId}</td>
                    <td>${device.deviceType}</td>
                    <td>${device.room}</td>
                </tr>
            `;

        });

        html += "</table>";

        document.getElementById("output").innerHTML = html;

    });
Save the file.
View the Results
Open:
http://localhost/json-demo/
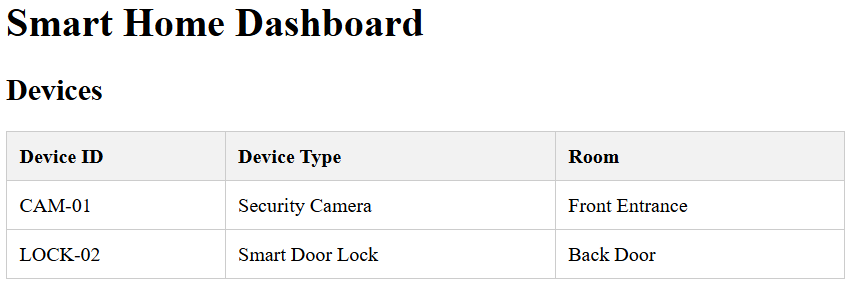
You should see:
| Device ID | Device Type | Room |
|---|---|---|
| CAM-01 | Security Camera | Front Entrance |
| LOCK-02 | Smart Door Lock | Back Door |
Add Basic Styling
The table works, but it looks very plain.
Add the following CSS inside the <head> section of index.html:
<style>

table {
    border-collapse: collapse;
    width: 100%;
}

th,
td {
    border: 1px solid #cccccc;
    padding: 10px;
    text-align: left;
}

th {
    background-color: #f2f2f2;
}

</style>
Refresh the page.
The table should now be easier to read.
Display the Home Information Above the Table
Update the start of the HTML string:
let html = `
    <p>
        <strong>Home ID:</strong>
        ${data.homeId}
    </p>

    <p>
        <strong>Location:</strong>
        ${data.location}
    </p>

    <h2>Devices</h2>

    <table border="1">

        <tr>
            <th>Device ID</th>
            <th>Device Type</th>
            <th>Room</th>
        </tr>
`;
The page should now display:
Home ID: GC-HOME-014
Location: Gold Coast

Devices
followed by the table.
Complete JavaScript File
fetch("smart_security_data.json")
    .then(response => response.json())
    .then(data => {

        let html = `
            <p>
                <strong>Home ID:</strong>
                ${data.homeId}
            </p>

            <p>
                <strong>Location:</strong>
                ${data.location}
            </p>

            <h2>Devices</h2>

            <table border="1">

                <tr>
                    <th>Device ID</th>
                    <th>Device Type</th>
                    <th>Room</th>
                </tr>
        `;

        data.devices.forEach(device => {

            html += `
                <tr>
                    <td>${device.deviceId}</td>
                    <td>${device.deviceType}</td>
                    <td>${device.room}</td>
                </tr>
            `;

        });

        html += "</table>";

        document.getElementById("output").innerHTML = html;

    });
You have successfully loaded JSON data and displayed it in an HTML table.
Next tutorial: Displaying Nested Event Data from JSON.
Displaying Nested Event Data from JSON
In the previous tutorial, you displayed device information in a table. In this tutorial, you will work with nested JSON data by displaying the security events associated with each device.
The JSON file contains devices, and each device contains its own list of events.
Understanding the JSON Structure
The JSON file contains:
Home
 └ Devices
     └ Events
Example:
{
    "deviceId": "CAM-01",
    "events": [
        {
            "eventType": "motion_detected"
        }
    ]
}
To display the events, we need to loop through:
- The devices
- The events within each device
Create an Events Table
Open:
script.js
Replace the previous code with:
fetch("smart_security_data.json")
    .then(response => response.json())
    .then(data => {

        let html = `
            <h2>Security Events</h2>

            <table border="1">

                <tr>
                    <th>Device ID</th>
                    <th>Event Type</th>
                    <th>Severity</th>
                </tr>
        `;

        data.devices.forEach(device => {

            device.events.forEach(event => {

                html += `
                    <tr>
                        <td>${device.deviceId}</td>
                        <td>${event.eventType}</td>
                        <td>${event.severity}</td>
                    </tr>
                `;

            });

        });

        html += "</table>";

        document.getElementById("output").innerHTML = html;

    });
View the Results
Open:
http://localhost/json-demo/
You should see a table similar to:
| Device ID | Event Type | Severity |
|---|---|---|
| CAM-01 | motion_detected | high |
| CAM-01 | remote_access_attempt | critical |
| LOCK-02 | unlock_attempt | medium |
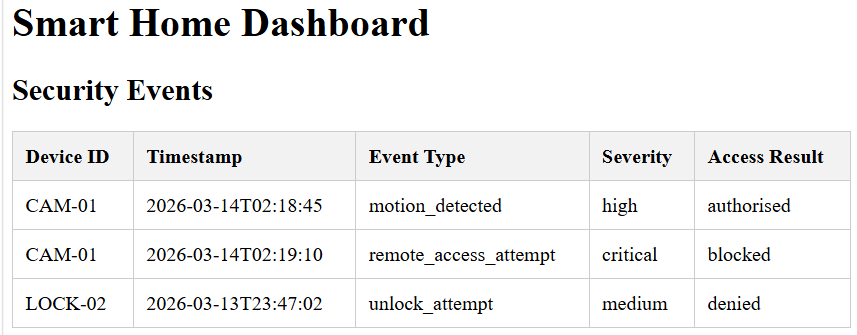
Add Additional Event Information
The JSON file contains more information about each event.
Each event includes:
timestamp
eventType
dataTransmitted
severity
accessResult
Update the table headings:
<tr>
    <th>Device ID</th>
    <th>Timestamp</th>
    <th>Event Type</th>
    <th>Severity</th>
    <th>Access Result</th>
</tr>
Update the Table Rows
Replace the existing row code with:
html += `
    <tr>
        <td>${device.deviceId}</td>
        <td>${event.timestamp}</td>
        <td>${event.eventType}</td>
        <td>${event.severity}</td>
        <td>${event.accessResult}</td>
    </tr>
`;
Refresh the page.
The table should now display more detailed event information.
Display the Device Type
Sometimes multiple devices may generate events.
Add another column heading:
<th>Device Type</th>
Update the row:
<td>${device.deviceType}</td>
Your table will now identify which type of device generated each event.
Complete JavaScript File
fetch("smart_security_data.json")
    .then(response => response.json())
    .then(data => {

        let html = `
            <h2>Security Events</h2>

            <table border="1">

                <tr>
                    <th>Device ID</th>
                    <th>Device Type</th>
                    <th>Timestamp</th>
                    <th>Event Type</th>
                    <th>Severity</th>
                    <th>Access Result</th>
                </tr>
        `;

        data.devices.forEach(device => {

            device.events.forEach(event => {

                html += `
                    <tr>
                        <td>${device.deviceId}</td>
                        <td>${device.deviceType}</td>
                        <td>${event.timestamp}</td>
                        <td>${event.eventType}</td>
                        <td>${event.severity}</td>
                        <td>${event.accessResult}</td>
                    </tr>
                `;

            });

        });

        html += "</table>";

        document.getElementById("output").innerHTML = html;

    });
What Happened?
In the previous tutorial, you looped through a single array:
data.devices
In this tutorial, you looped through:
data.devices
and then:
device.events
This is known as a nested loop and is commonly used when working with JSON files and APIs.
You have successfully displayed nested JSON data in a table.
Next tutorial: Creating a Security Dashboard from JSON Data.
Creating a Security Dashboard from JSON Data
In the previous tutorial, you displayed individual security events in a table. In this tutorial, you will create a simple dashboard that summarises the data and highlights important security information.
The dashboard will display:
- Total Devices
- Total Events
- Critical Events
- High Severity Events
- Medium Severity Events
Using the sample JSON file, there are 2 devices and 3 events, including one critical event.
Create a Dashboard Section
Open:
script.js
Replace the existing code with:
fetch("smart_security_data.json")
    .then(response => response.json())
    .then(data => {

        let totalDevices = data.devices.length;

        let totalEvents = 0;
        let criticalEvents = 0;
        let highEvents = 0;
        let mediumEvents = 0;

        data.devices.forEach(device => {

            device.events.forEach(event => {

                totalEvents++;

                if (event.severity === "critical") {
                    criticalEvents++;
                }

                if (event.severity === "high") {
                    highEvents++;
                }

                if (event.severity === "medium") {
                    mediumEvents++;
                }

            });

        });

    });
This code calculates summary statistics from the JSON data.
Create Dashboard Cards
Below the calculations, add:
let html = `
    <h2>Security Dashboard</h2>

    <div class="card">
        <h3>Total Devices</h3>
        <p>${totalDevices}</p>
    </div>

    <div class="card">
        <h3>Total Events</h3>
        <p>${totalEvents}</p>
    </div>

    <div class="card">
        <h3>Critical Events</h3>
        <p>${criticalEvents}</p>
    </div>

    <div class="card">
        <h3>High Events</h3>
        <p>${highEvents}</p>
    </div>

    <div class="card">
        <h3>Medium Events</h3>
        <p>${mediumEvents}</p>
    </div>
`;
Display the Dashboard
Add:
document.getElementById("output").innerHTML = html;
The completed code should now display the dashboard cards.
Add Dashboard Styling
Open:
index.html
Inside the <style> section, add:
.card {
    border: 1px solid #cccccc;
    border-radius: 8px;
    padding: 15px;
    margin-bottom: 10px;
}

.card h3 {
    margin-top: 0;
}
Save the file.
View the Dashboard
Open:
http://localhost/json-demo/
Using the sample JSON file, you should see something similar to:
Security Dashboard

Total Devices: 2
Total Events: 3
Critical Events: 1
High Events: 1
Medium Events: 1
Display the Event Table Below the Dashboard
The dashboard is useful, but users often want to see the detailed events as well.
Add the following code underneath the dashboard cards:
html += `
    <h2>Security Events</h2>

    <table border="1">

        <tr>
            <th>Device ID</th>
            <th>Event Type</th>
            <th>Severity</th>
        </tr>
`;
Add Event Rows
Add:
data.devices.forEach(device => {

    device.events.forEach(event => {

        html += `
            <tr>
                <td>${device.deviceId}</td>
                <td>${event.eventType}</td>
                <td>${event.severity}</td>
            </tr>
        `;

    });

});
Close the table:
html += "</table>";
Complete JavaScript File
fetch("smart_security_data.json")
    .then(response => response.json())
    .then(data => {

        let totalDevices = data.devices.length;

        let totalEvents = 0;
        let criticalEvents = 0;
        let highEvents = 0;
        let mediumEvents = 0;

        data.devices.forEach(device => {

            device.events.forEach(event => {

                totalEvents++;

                if (event.severity === "critical") criticalEvents++;
                if (event.severity === "high") highEvents++;
                if (event.severity === "medium") mediumEvents++;

            });

        });

        let html = `
            <h2>Security Dashboard</h2>

            <div class="card">
                <h3>Total Devices</h3>
                <p>${totalDevices}</p>
            </div>

            <div class="card">
                <h3>Total Events</h3>
                <p>${totalEvents}</p>
            </div>

            <div class="card">
                <h3>Critical Events</h3>
                <p>${criticalEvents}</p>
            </div>

            <div class="card">
                <h3>High Events</h3>
                <p>${highEvents}</p>
            </div>

            <div class="card">
                <h3>Medium Events</h3>
                <p>${mediumEvents}</p>
            </div>

            <h2>Security Events</h2>

            <table border="1">

                <tr>
                    <th>Device ID</th>
                    <th>Event Type</th>
                    <th>Severity</th>
                </tr>
        `;

        data.devices.forEach(device => {

            device.events.forEach(event => {

                html += `
                    <tr>
                        <td>${device.deviceId}</td>
                        <td>${event.eventType}</td>
                        <td>${event.severity}</td>
                    </tr>
                `;

            });

        });

        html += "</table>";

        document.getElementById("output").innerHTML = html;

    });
You now have a dashboard that summarises JSON data and displays detailed event information underneath.
Next tutorial: Filtering and Highlighting Critical Security Events.