# PHP and MySQL

Tutorials covering PHP, MySQL and web application development.

# Login Systems

# Creating a User Database and Table Using SQL

Many PHP applications require a user table to store login information. In this tutorial, you will create a database, create a users table, and add your first user account using SQL statements in phpMyAdmin.

---

## Open phpMyAdmin

Open phpMyAdmin in your browser.

Example:


[http://localhost/phpmyadmin/](http://localhost/phpmyadmin/)


Once phpMyAdmin has loaded, select the **SQL** tab.

[![](/uploads/images/gallery/2026-06/scaled-1680-/image-1780873621757.png)](/uploads/images/gallery/2026-06/image-1780873621757.png)

---

## Create a Database

Run the following SQL statement:

```sql
CREATE DATABASE project_db;
```

Select the new database:

```sql
USE project_db;
```

The database will store all of the tables required for your project.

[![](https://mr.napper.au/uploads/images/gallery/2026-06/scaled-1680-/image-1780891972419.png)](https://mr.napper.au/uploads/images/gallery/2026-06/image-1780891972419.png)

## Create a Users Table

Run the following SQL statement:

```sql
CREATE TABLE users (
    user_id INT AUTO_INCREMENT PRIMARY KEY,
    username VARCHAR(50) NOT NULL,
    password VARCHAR(255) NOT NULL
);
```

This creates a table named `users` containing:

| Field    | Purpose                         |
| -------- | ------------------------------- |
| user_id  | Unique identifier for each user |
| username | Stores the username             |
| password | Stores the password             |

The `user_id` field is the primary key. Every record in the table must have a unique primary key value. The `AUTO_INCREMENT` setting automatically generates the next available number whenever a new user is added.

[![](https://mr.napper.au/uploads/images/gallery/2026-06/scaled-1680-/image-1780892035238.png)](https://mr.napper.au/uploads/images/gallery/2026-06/image-1780892035238.png)>

## Create the First User Account

Run the following SQL statement:

```sql
INSERT INTO users (username, password)
VALUES ('admin', 'password123');
```

This creates a user account with the username `admin` and password `password123`.


## View the Data

To display all records stored in the table, run:

```sql
SELECT * FROM users;
```

You should see something similar to:

| user_id | username | password    |
| ------- | -------- | ----------- |
| 1       | admin    | password123 |

[![](https://mr.napper.au/uploads/images/gallery/2026-06/scaled-1680-/image-1780892110791.png)](https://mr.napper.au/uploads/images/gallery/2026-06/image-1780892110791.png)

## Add Another User

Additional users can be added using the same `INSERT` statement:

```sql
INSERT INTO users (username, password)
VALUES ('teacher', 'secret123');
```

Display the table again:

```sql
SELECT * FROM users;
```

Result:

| user_id | username | password    |
| ------- | -------- | ----------- |
| 1       | admin    | password123 |
| 2       | teacher  | secret123   |

Notice that the `user_id` value automatically increases for each new user.

[![](https://mr.napper.au/uploads/images/gallery/2026-06/scaled-1680-/image-1780892188358.png)](https://mr.napper.au/uploads/images/gallery/2026-06/image-1780892188358.png)

## Security Note

In this tutorial, passwords are stored as plain text so the table structure is easy to understand.

In a real application, passwords should never be stored this way. The next tutorial will demonstrate how to securely store passwords using password hashing.

---

## Complete SQL Script

```sql
CREATE DATABASE project_db;

USE project_db;

CREATE TABLE users (
    user_id INT AUTO_INCREMENT PRIMARY KEY,
    username VARCHAR(50) NOT NULL,
    password VARCHAR(255) NOT NULL
);

INSERT INTO users (username, password)
VALUES ('admin', 'password123');

INSERT INTO users (username, password)
VALUES ('teacher', 'secret123');

SELECT * FROM users;
```

You now have a database and user table ready to connect to a PHP login system.

# Secure Password Storage with Password Hashing

In the previous tutorial, passwords were stored as plain text in the database. In this tutorial, you will update your project to store passwords securely using PHP password hashing.

---

## Why Hash Passwords?

When passwords are stored as plain text, anyone with access to the database can read them.

Example:

| username | password    |
| -------- | ----------- |
| admin    | password123 |
| teacher  | secret123   |

A hashed password looks like this:

```text
$2y$10$F8xJYQjN8s0T8f9mK6n7Iu8j9L2mWm9J4hJj7Qz0vB5lK3sHn8QyW
```

The original password cannot easily be recovered from the hash.

---

## Create a Password Hash

Create a new PHP file called:

```text
hash_password.php
```

Add the following code:

```php
<?php

$password = "password123";

$hashedPassword = password_hash($password, PASSWORD_DEFAULT);

echo $hashedPassword;

?>
```

Save the file in your web server folder and run it in your browser.

Example:

```text
http://localhost/hash_password.php
```

You should see a long string similar to:

```text
$2y$10$F8xJYQjN8s0T8f9mK6n7Iu8j9L2mWm9J4hJj7Qz0vB5lK3sHn8QyW
```


## Copy the Hash

Select and copy the generated hash.

You will use this value instead of the plain text password.

---

## Update the Admin Account

Open phpMyAdmin.

Select the `users` table.

Locate the `admin` account and click **Edit**.

Replace:

```text
password123
```

with your generated password hash.

Click **Go** to save the changes.


## Verify the Password Was Updated

Run:

```sql
SELECT * FROM users;
```

The password column should now contain a long hash instead of a readable password.

Example:

| user_id | username | password   |
| ------- | -------- | ---------- |
| 1       | admin    | $2y$10$... |

[![](https://mr.napper.au/uploads/images/gallery/2026-06/scaled-1680-/image-1780893235829.png)](https://mr.napper.au/uploads/images/gallery/2026-06/image-1780893235829.png)

## Verify a Password

Create a new file called:

```text
verify_password.php
```

Add the following code:

```php
<?php

$password = "password123";

$hash = '$2y$10$F8xJYQjN8s0T8f9mK6n7Iu8j9L2mWm9J4hJj7Qz0vB5lK3sHn8QyW';

if (password_verify($password, $hash)) {
    echo "Password is correct";
} else {
    echo "Password is incorrect";
}

?>
```

Replace the example hash with your own generated hash.

Open the file in your browser.

Example:

```text
http://localhost/verify_password.php
```

You should see:

```text
Password is correct
```

## Test an Incorrect Password

Change:

```php
$password = "password123";
```

to:

```php
$password = "wrongpassword";
```

Refresh the page.

You should now see:

```text
Password is incorrect
```

## Common Mistake

Do not use:

```php
md5()
```

or

```php
sha1()
```

for password storage.

Modern PHP applications should use:

```php
password_hash()
password_verify()
```

These functions automatically use secure hashing algorithms and are updated as PHP improves.

---

## Complete Example

### Generate a Hash

```php
<?php

$password = "password123";

$hashedPassword = password_hash($password, PASSWORD_DEFAULT);

echo $hashedPassword;

?>
```

### Verify a Password

```php
<?php

$password = "password123";

$hash = '$2y$10$YOUR_HASH_HERE';

if (password_verify($password, $hash)) {
    echo "Password is correct";
} else {
    echo "Password is incorrect";
}

?>
```

You are now storing passwords securely and are ready to create a user registration form.

# Creating a User Registration Form

In the previous tutorial, you created a users table and learned how to securely store passwords using password hashing. In this tutorial, you will create a registration form that allows new users to create an account and store their details in the database.

---

## Create the Registration Form

Create a new file called:

```text
register.php
```

Add the following code:

```php
<!DOCTYPE html>
<html>
<head>
    <title>User Registration</title>
</head>
<body>

<h1>Create Account</h1>

<form action="register.php" method="post">

    <label>Username</label><br>
    <input type="text" name="username" required><br><br>

    <label>Password</label><br>
    <input type="password" name="password" required><br><br>

    <button type="submit">Register</button>

</form>

</body>
</html>
```

Save the file and open it in your browser.

Example:

```text
http://localhost/register.php
```

You should see a simple registration form.

[![](https://mr.napper.au/uploads/images/gallery/2026-06/scaled-1680-/image-1780893823644.png)](https://mr.napper.au/uploads/images/gallery/2026-06/image-1780893823644.png)

## Connect to the Database

Add the following PHP code immediately before the `<!DOCTYPE html>` line:

```php
<?php

$conn = new mysqli(
    "localhost",
    "root",
    "",
    "project_db"
);

if ($conn->connect_error) {
    die("Connection failed: " . $conn->connect_error);
}

?>
```

This creates a connection to the `project_db` database.

## Process the Form Submission

Add the following code underneath the database connection:

```php
if ($_SERVER["REQUEST_METHOD"] == "POST") {

    $username = $_POST["username"];
    $password = $_POST["password"];

}
```

This code runs when the form is submitted.

---

## Hash the Password

Inside the `if` statement, add:

```php
$hashedPassword = password_hash(
    $password,
    PASSWORD_DEFAULT
);
```

Your code should now look like:

```php
if ($_SERVER["REQUEST_METHOD"] == "POST") {

    $username = $_POST["username"];
    $password = $_POST["password"];

    $hashedPassword = password_hash(
        $password,
        PASSWORD_DEFAULT
    );

}
```

The password will now be securely hashed before being stored.

---

## Insert the User into the Database

Add the following code underneath the password hashing:

```php
$stmt = $conn->prepare(
    "INSERT INTO users (username, password)
     VALUES (?, ?)"
);

$stmt->bind_param(
    "ss",
    $username,
    $hashedPassword
);

$stmt->execute();
```

This inserts the username and hashed password into the users table.

---

## Display a Success Message

Add:

```php
echo "<p>Account created successfully.</p>";
```

The completed section should look like:

```php
if ($_SERVER["REQUEST_METHOD"] == "POST") {

    $username = $_POST["username"];
    $password = $_POST["password"];

    $hashedPassword = password_hash(
        $password,
        PASSWORD_DEFAULT
    );

    $stmt = $conn->prepare(
        "INSERT INTO users (username, password)
         VALUES (?, ?)"
    );

    $stmt->bind_param(
        "ss",
        $username,
        $hashedPassword
    );

    $stmt->execute();

    echo "<p>Account created successfully.</p>";
}
```

---

## Create a New User Account

Open:

```text
http://localhost/register.php
```

Enter:

```text
Username: testuser
Password: mypassword
```

Click **Register**.

You should see:

```text
Account created successfully.
```


## Check the Database

Open phpMyAdmin and view the users table.

Run:

```sql
SELECT * FROM users;
```

You should now see the new account.

Example:

| user_id | username | password   |
| ------- | -------- | ---------- |
| 1       | admin    | $2y$10$... |
| 2       | teacher  | $2y$10$... |
| 3       | testuser | $2y$10$... |

Notice that the password is stored as a hash rather than plain text.

[![](https://mr.napper.au/uploads/images/gallery/2026-06/scaled-1680-/image-1780894149294.png)](https://mr.napper.au/uploads/images/gallery/2026-06/image-1780894149294.png)


## Complete Code

```php
<?php

$conn = new mysqli(
    "localhost",
    "root",
    "",
    "project_db"
);

if ($conn->connect_error) {
    die("Connection failed: " . $conn->connect_error);
}

if ($_SERVER["REQUEST_METHOD"] == "POST") {

    $username = $_POST["username"];
    $password = $_POST["password"];

    $hashedPassword = password_hash(
        $password,
        PASSWORD_DEFAULT
    );

    $stmt = $conn->prepare(
        "INSERT INTO users (username, password)
         VALUES (?, ?)"
    );

    $stmt->bind_param(
        "ss",
        $username,
        $hashedPassword
    );

    $stmt->execute();

    echo "<p>Account created successfully.</p>";
}

?>

<!DOCTYPE html>
<html>
<head>
    <title>User Registration</title>
</head>
<body>

<h1>Create Account</h1>

<form action="register.php" method="post">

    <label>Username</label><br>
    <input type="text" name="username" required><br><br>

    <label>Password</label><br>
    <input type="password" name="password" required><br><br>

    <button type="submit">Register</button>

</form>

</body>
</html>
```

You now have a working registration form that stores user accounts in the database using secure password hashing.

Next tutorial: **Creating a Login Form**.

# Creating a Login Form

In the previous tutorial, you created a registration form that stores users in the database. In this tutorial, you will create a login form that checks a username and password against the database and allows a user to log in.

---

## Create the Login Page

Create a new file called:

```text
login.php
```

Add the following code:

```php
<!DOCTYPE html>
<html>
<head>
    <title>Login</title>
</head>
<body>

<h1>Login</h1>

<form action="login.php" method="post">

    <label>Username</label><br>
    <input type="text" name="username" required><br><br>

    <label>Password</label><br>
    <input type="password" name="password" required><br><br>

    <button type="submit">Login</button>

</form>

</body>
</html>
```

Save the file and open it in your browser.

Example:

```text
http://localhost/login.php
```

[![](https://mr.napper.au/uploads/images/gallery/2026-06/scaled-1680-/image-1780894283100.png)](https://mr.napper.au/uploads/images/gallery/2026-06/image-1780894283100.png)

## Connect to the Database

Add the following code above the `<!DOCTYPE html>` line:

```php
<?php

$conn = new mysqli(
    "localhost",
    "root",
    "",
    "project_db"
);

if ($conn->connect_error) {
    die("Connection failed: " . $conn->connect_error);
}

?>
```

This creates a connection to the database.

---

## Process the Login Form

Add the following code underneath the database connection:

```php
if ($_SERVER["REQUEST_METHOD"] == "POST") {

    $username = $_POST["username"];
    $password = $_POST["password"];

}
```

This code will run when the form is submitted.

---

## Find the User

Inside the `if` statement, add:

```php
$stmt = $conn->prepare(
    "SELECT * FROM users
     WHERE username = ?"
);

$stmt->bind_param(
    "s",
    $username
);

$stmt->execute();

$result = $stmt->get_result();
```

This searches the database for the username entered on the form.

---

## Check if the User Exists

Add:

```php
if ($result->num_rows == 1) {

    $user = $result->fetch_assoc();

}
else {

    echo "<p>User not found.</p>";

}
```

If the username exists, the user's record is loaded from the database.

---

## Verify the Password

Inside the successful login section, add:

```php
if (
    password_verify(
        $password,
        $user["password"]
    )
) {

    echo "<p>Login successful.</p>";

}
else {

    echo "<p>Incorrect password.</p>";

}
```

This compares the entered password against the stored password hash.

---

## Complete Login Logic

Your completed login section should look like:

```php
if ($_SERVER["REQUEST_METHOD"] == "POST") {

    $username = $_POST["username"];
    $password = $_POST["password"];

    $stmt = $conn->prepare(
        "SELECT * FROM users
         WHERE username = ?"
    );

    $stmt->bind_param(
        "s",
        $username
    );

    $stmt->execute();

    $result = $stmt->get_result();

    if ($result->num_rows == 1) {

        $user = $result->fetch_assoc();

        if (
            password_verify(
                $password,
                $user["password"]
            )
        ) {

            echo "<p>Login successful.</p>";

        }
        else {

            echo "<p>Incorrect password.</p>";

        }

    }
    else {

        echo "<p>User not found.</p>";

    }

}
```

---

## Test a Successful Login

Open:

```text
http://localhost/login.php
```

Enter a username and password that already exist in the database.

Example:

```text
Username: admin
Password: password123
```

Click **Login**.

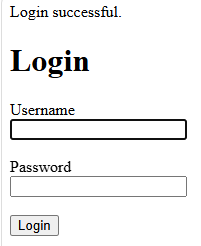
You should see:

```text
Login successful.
```

[![](https://mr.napper.au/uploads/images/gallery/2026-06/scaled-1680-/image-1780894384204.png)](https://mr.napper.au/uploads/images/gallery/2026-06/image-1780894384204.png)

## Test an Incorrect Password

Enter:

```text
Username: admin
Password: wrongpassword
```

Click **Login**.

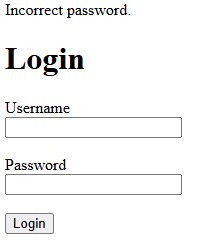
You should see:

```text
Incorrect password.
```

[![](https://mr.napper.au/uploads/images/gallery/2026-06/scaled-1680-/image-1780894428828.png)](https://mr.napper.au/uploads/images/gallery/2026-06/image-1780894428828.png)

## Test an Unknown User

Enter:

```text
Username: unknownuser
Password: password123
```

Click **Login**.

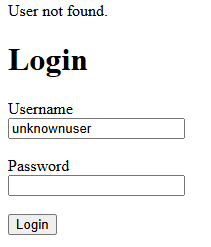
You should see:

```text
User not found.
```

[![](https://mr.napper.au/uploads/images/gallery/2026-06/scaled-1680-/image-1780894454026.png)](https://mr.napper.au/uploads/images/gallery/2026-06/image-1780894454026.png)

## Complete Code

```php
<?php

$conn = new mysqli(
    "localhost",
    "root",
    "",
    "project_db"
);

if ($conn->connect_error) {
    die("Connection failed: " . $conn->connect_error);
}

if ($_SERVER["REQUEST_METHOD"] == "POST") {

    $username = $_POST["username"];
    $password = $_POST["password"];

    $stmt = $conn->prepare(
        "SELECT * FROM users
         WHERE username = ?"
    );

    $stmt->bind_param(
        "s",
        $username
    );

    $stmt->execute();

    $result = $stmt->get_result();

    if ($result->num_rows == 1) {

        $user = $result->fetch_assoc();

        if (
            password_verify(
                $password,
                $user["password"]
            )
        ) {

            echo "<p>Login successful.</p>";

        }
        else {

            echo "<p>Incorrect password.</p>";

        }

    }
    else {

        echo "<p>User not found.</p>";

    }

}

?>

<!DOCTYPE html>
<html>
<head>
    <title>Login</title>
</head>
<body>

<h1>Login</h1>

<form action="login.php" method="post">

    <label>Username</label><br>
    <input type="text" name="username" required><br><br>

    <label>Password</label><br>
    <input type="password" name="password" required><br><br>

    <button type="submit">Login</button>

</form>

</body>
</html>
```

You now have a working login form that validates usernames and passwords against your database.

Next tutorial: **Using PHP Sessions to Keep Users Logged In**.

# Using PHP Sessions to Keep Users Logged In

In the previous tutorial, you created a login form that verified usernames and passwords. In this tutorial, you will use PHP sessions to remember who is logged in and keep them signed in while they navigate your website.

---

## What is a Session?

A session allows PHP to store information about a user while they move between pages.

Without sessions, a website would forget who the user is every time a new page loads.

---

## Start a Session

Open your existing:

```text
login.php
```

Add the following code at the very top of the file:

```php
<?php

session_start();

?>
```

The `session_start()` function must be called before any HTML is sent to the browser.

Your file should now begin with:

```php
<?php

session_start();

$conn = new mysqli(
    "localhost",
    "root",
    "",
    "project_db"
);
```

---

## Store User Information in the Session

Locate this section:

```php
if (
    password_verify(
        $password,
        $user["password"]
    )
) {

    echo "<p>Login successful.</p>";

}
```

Replace it with:

```php
if (
    password_verify(
        $password,
        $user["password"]
    )
) {

    $_SESSION["user_id"] = $user["user_id"];
    $_SESSION["username"] = $user["username"];

    echo "<p>Login successful.</p>";

}
```

When a user logs in successfully, their information is now stored in the session.

---

## Create a Members Page

Create a new file called:

```text
members.php
```

Add the following code:

```php
<?php

session_start();

?>

<!DOCTYPE html>
<html>
<head>
    <title>Members Area</title>
</head>
<body>

<h1>Members Area</h1>

<p>Welcome,
<?php echo $_SESSION["username"]; ?>
</p>

</body>
</html>
```

Save the file.

---

## Open the Members Page

Visit:

```text
http://localhost/members.php
```

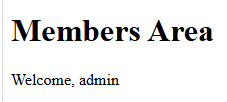
If you have logged in successfully, you should see:

```text
Members Area

Welcome, admin
```

or whatever username was used to log in.

[![](https://mr.napper.au/uploads/images/gallery/2026-06/scaled-1680-/image-1780894712588.png)](https://mr.napper.au/uploads/images/gallery/2026-06/image-1780894712588.png)

## Display Additional Session Information

You can access any values stored in the session.

For example:

```php
<p>User ID:
<?php echo $_SESSION["user_id"]; ?>
</p>
```

Result:

```text
User ID: 1
```

---

## View the Session Data

Add the following code to the members page:

```php
<pre>
<?php
print_r($_SESSION);
?>
</pre>
```

Example output:

```text
Array
(
    [user_id] => 1
    [username] => admin
)
```

This can be useful when testing.


## Redirect Users After Login

Instead of displaying:

```php
echo "<p>Login successful.</p>";
```

replace the success code with:

```php
$_SESSION["user_id"] = $user["user_id"];
$_SESSION["username"] = $user["username"];

header("Location: members.php");
exit();
```

Now users will be automatically redirected to the members page after a successful login.

---

## Test the Complete Process

1. Open:

```text
http://localhost/login.php
```

2. Log in using an existing account.

3. You should be redirected to:

```text
http://localhost/members.php
```

4. The page should display your username.

> **Screenshot Placeholder**
>
> Insert screenshot showing the successful login redirect.

---

## Complete Login Success Code

```php
if (
    password_verify(
        $password,
        $user["password"]
    )
) {

    $_SESSION["user_id"] = $user["user_id"];
    $_SESSION["username"] = $user["username"];

    header("Location: members.php");
    exit();

}
```

---

## Complete Members Page

```php
<?php

session_start();

?>

<!DOCTYPE html>
<html>
<head>
    <title>Members Area</title>
</head>
<body>

<h1>Members Area</h1>

<p>Welcome,
<?php echo $_SESSION["username"]; ?>
</p>

<p>User ID:
<?php echo $_SESSION["user_id"]; ?>
</p>

</body>
</html>
```

You now have a working login system that remembers users between pages using PHP sessions.

Next tutorial: **Protecting Pages and Preventing Unauthorised Access**.

# Protecting Pages and Preventing Unauthorised Access

In the previous tutorial, you used PHP sessions to remember who was logged in. In this tutorial, you will prevent users from accessing protected pages unless they have successfully logged in.

---

## The Problem

Currently, anyone can access:

```text
http://localhost/members.php
```

even if they have not logged in.

To secure the page, we need to check whether a valid session exists before displaying any content.

---

## Open the Members Page

Open:

```text
members.php
```

Your page should currently begin with:

```php
<?php

session_start();

?>
```

---

## Check if the User is Logged In

Add the following code immediately after `session_start()`:

```php
if (!isset($_SESSION["user_id"])) {

    header("Location: login.php");
    exit();

}
```

Your page should now begin with:

```php
<?php

session_start();

if (!isset($_SESSION["user_id"])) {

    header("Location: login.php");
    exit();

}

?>
```

This checks whether the session contains a `user_id`.

If it does not, the user is redirected to the login page.

---

## Test the Protection

Open a private or incognito browser window.

Attempt to visit:

```text
http://localhost/members.php
```

Instead of seeing the members page, you should be redirected to:

```text
http://localhost/login.php
```

## Test After Logging In

Log in using a valid account.

Example:

```text
Username: admin
Password: password123
```

After logging in, you should be redirected to:

```text
http://localhost/members.php
```

The page should display your username.


## Create a Second Protected Page

Create a new file called:

```text
settings.php
```

Add the following code:

```php
<?php

session_start();

if (!isset($_SESSION["user_id"])) {

    header("Location: login.php");
    exit();

}

?>

<!DOCTYPE html>
<html>
<head>
    <title>Settings</title>
</head>
<body>

<h1>Settings Page</h1>

<p>Only logged-in users can view this page.</p>

</body>
</html>
```

Save the file.

---

## Test the Settings Page

Visit:

```text
http://localhost/settings.php
```

If you are logged in, the page should load.

If you are not logged in, you should be redirected to the login page.


## Reusing the Protection Code

Any page that should require a login can use the same code:

```php
<?php

session_start();

if (!isset($_SESSION["user_id"])) {

    header("Location: login.php");
    exit();

}

?>
```

Examples:

```text
members.php
settings.php
profile.php
dashboard.php
```

---

## Complete Protected Members Page

```php
<?php

session_start();

if (!isset($_SESSION["user_id"])) {

    header("Location: login.php");
    exit();

}

?>

<!DOCTYPE html>
<html>
<head>
    <title>Members Area</title>
</head>
<body>

<h1>Members Area</h1>

<p>Welcome,
<?php echo $_SESSION["username"]; ?>
</p>

<p>User ID:
<?php echo $_SESSION["user_id"]; ?>
</p>

</body>
</html>
```

You now have pages that can only be accessed by authenticated users.

Next tutorial: **Creating a Logout Page**.

# Creating a Logout Page

In the previous tutorial, you protected pages so that only logged-in users could access them. In this tutorial, you will create a logout page that destroys the user's session and returns them to the login page.

---

## Why Do We Need Logout?

When a user logs in, their information is stored in a PHP session.

For example:

```text
user_id = 1
username = admin
```

To completely sign the user out, we need to remove this session information.

---

## Create the Logout Page

Create a new file called:

```text
logout.php
```

Add the following code:

```php
<?php

session_start();

session_destroy();

header("Location: login.php");
exit();

?>
```

Save the file.

---

## Understanding the Code

The following line starts the current session:

```php
session_start();
```

The following line removes all session data:

```php
session_destroy();
```

Finally, the user is redirected back to the login page:

```php
header("Location: login.php");
exit();
```

---

## Test the Logout Page

First, log in to your application.

You should be redirected to:

```text
http://localhost/members.php
```

Now manually visit:

```text
http://localhost/logout.php
```

You should immediately be redirected to:

```text
http://localhost/login.php
```

## Verify the Session Has Been Removed

After visiting:

```text
http://localhost/logout.php
```

attempt to access:

```text
http://localhost/members.php
```

You should no longer have access.

Instead, you should be redirected back to:

```text
http://localhost/login.php
```

This confirms that the session was successfully destroyed.

## Add a Logout Link

Open:

```text
members.php
```

Add the following code near the bottom of the page:

```html
<p>
    <a href="logout.php">Logout</a>
</p>
```

Example:

```php
<h1>Members Area</h1>

<p>Welcome,
<?php echo $_SESSION["username"]; ?>
</p>

<p>User ID:
<?php echo $_SESSION["user_id"]; ?>
</p>

<p>
    <a href="logout.php">Logout</a>
</p>
```

Save the file.

---

## Test the Logout Link

1. Log in.
2. Open the Members Area.
3. Click the Logout link.
4. Confirm you are returned to the login page.
5. Attempt to revisit members.php.

You should be redirected back to the login page.

## Complete logout.php File

```php
<?php

session_start();

session_destroy();

header("Location: login.php");
exit();

?>
```

---

## Complete Updated members.php File

```php
<?php

session_start();

if (!isset($_SESSION["user_id"])) {

    header("Location: login.php");
    exit();

}

?>

<!DOCTYPE html>
<html>
<head>
    <title>Members Area</title>
</head>
<body>

<h1>Members Area</h1>

<p>Welcome,
<?php echo $_SESSION["username"]; ?>
</p>

<p>User ID:
<?php echo $_SESSION["user_id"]; ?>
</p>

<p>
    <a href="logout.php">Logout</a>
</p>

</body>
</html>
```

You now have a complete authentication system that allows users to:

* Register an account
* Log in
* Stay logged in using sessions
* Access protected pages
* Log out

Next tutorial: **Adding Role-Based Access Control (Admin, Teacher and Student Accounts)**.

# Adding Role-Based Access Control

In the previous tutorials, users could register, log in, access protected pages and log out. In this tutorial, you will add roles to your user accounts and restrict access to pages based on those roles.

The system will support three roles:

```text
admin
teacher
student
```

---

## Add a Role Column to the Users Table

Open phpMyAdmin and select your `project_db` database.

Run the following SQL statement:

```sql
ALTER TABLE users
ADD role VARCHAR(20) NOT NULL DEFAULT 'student';
```

This creates a new field called `role` and automatically assigns the value `student` to any existing or future users.


## Check the Updated Table

Run:

```sql
SELECT * FROM users;
```

You should now see a role column.

Example:

| user_id | username | password   | role    |
| ------- | -------- | ---------- | ------- |
| 1       | admin    | $2y$10$... | student |
| 2       | teacher  | $2y$10$... | student |


## Update Existing Users

Update the admin account:

```sql
UPDATE users
SET role = 'admin'
WHERE username = 'admin';
```

Update the teacher account:

```sql
UPDATE users
SET role = 'teacher'
WHERE username = 'teacher';
```

Run:

```sql
SELECT * FROM users;
```

Example:

| user_id | username | role    |
| ------- | -------- | ------- |
| 1       | admin    | admin   |
| 2       | teacher  | teacher |
| 3       | testuser | student |

[![](https://mr.napper.au/uploads/images/gallery/2026-06/scaled-1680-/image-1780909123223.png)](https://mr.napper.au/uploads/images/gallery/2026-06/image-1780909123223.png)


## Store the User Role in the Session

Open:

```text
login.php
```

Locate:

```php
$_SESSION["user_id"] = $user["user_id"];
$_SESSION["username"] = $user["username"];
```

Add:

```php
$_SESSION["role"] = $user["role"];
```

The completed section should look like:

```php
$_SESSION["user_id"] = $user["user_id"];
$_SESSION["username"] = $user["username"];
$_SESSION["role"] = $user["role"];

header("Location: members.php");
exit();
```

This stores the user's role when they log in.

---

## Display the User Role

Open:

```text
members.php
```

Add:

```php
<p>Role:
<?php echo $_SESSION["role"]; ?>
</p>
```

Example:

```php
<p>Welcome,
<?php echo $_SESSION["username"]; ?>
</p>

<p>Role:
<?php echo $_SESSION["role"]; ?>
</p>
```

Save the file and log in.

Example result:

```text
Welcome, admin

Role: admin
```

## Create an Admin Page

Create a new file called:

```text
admin.php
```

Add the following code:

```php
<?php

session_start();

if (!isset($_SESSION["user_id"])) {

    header("Location: login.php");
    exit();

}

if ($_SESSION["role"] != "admin") {

    die("Access denied.");

}

?>

<!DOCTYPE html>
<html>
<head>
    <title>Admin Area</title>
</head>
<body>

<h1>Admin Area</h1>

<p>Welcome,
<?php echo $_SESSION["username"]; ?>
</p>

</body>
</html>
```

Save the file.

---

## Test Admin Access

Log in as:

```text
admin
```

Visit:

```text
http://localhost/admin.php
```

The page should load successfully.


## Test Non-Admin Access

Log out.

Log in as:

```text
teacher
```

or

```text
student
```

Visit:

```text
http://localhost/admin.php
```

You should see:

```text
Access denied.
```


## Add an Admin Link

Open:

```text
members.php
```

Add:

```php
<?php if ($_SESSION["role"] == "admin") { ?>

<p>
    <a href="admin.php">Admin Area</a>
</p>

<?php } ?>
```

Example:

```php
<p>
    <a href="logout.php">Logout</a>
</p>

<?php if ($_SESSION["role"] == "admin") { ?>

<p>
    <a href="admin.php">Admin Area</a>
</p>

<?php } ?>
```

Now only administrators will see the Admin Area link.

---

## Complete SQL Commands

```sql
ALTER TABLE users
ADD role VARCHAR(20) NOT NULL DEFAULT 'student';

UPDATE users
SET role = 'admin'
WHERE username = 'admin';

UPDATE users
SET role = 'teacher'
WHERE username = 'teacher';

SELECT * FROM users;
```

---

## Complete Role Storage Code

```php
$_SESSION["user_id"] = $user["user_id"];
$_SESSION["username"] = $user["username"];
$_SESSION["role"] = $user["role"];

header("Location: members.php");
exit();
```

You now have a role-based access system that supports:

* Admin users
* Teacher users
* Student users

You can use the same technique to create protected pages for different user groups.

Next tutorial: **Creating a Navigation Menu Based on User Roles**.

# Creating a Navigation Menu Based on User Roles

In the previous tutorial, you created a role-based access control system using admin, teacher and student accounts. In this tutorial, you will build a navigation menu that changes depending on the role of the logged-in user.

This allows different users to see different menu options.

---

## Current Situation

At the moment, every user sees the same page after logging in.

Example:

```text
Welcome, admin

Role: admin

Logout
```

We can improve this by displaying different navigation links based on the user's role.

---

## Create a Navigation Section

Open:

```text
members.php
```

Add the following code underneath the welcome message:

```php
<h2>Navigation</h2>

<ul>

    <li>
        <a href="members.php">
            Home
        </a>
    </li>

</ul>
```

The page should now display a simple menu.

[![](https://mr.napper.au/uploads/images/gallery/2026-06/scaled-1680-/image-1780909901613.png)](https://mr.napper.au/uploads/images/gallery/2026-06/image-1780909901613.png)

## Add an Admin Link

Add the following code inside the navigation list:

```php
<?php if ($_SESSION["role"] == "admin") { ?>

<li>
    <a href="admin.php">
        Admin Area
    </a>
</li>

<?php } ?>
```

This link will only appear for administrators.

---

## Create a Teacher Page

Create a new file called:

```text
teacher.php
```

Add the following code:

```php
<?php

session_start();

if (!isset($_SESSION["user_id"])) {

    header("Location: login.php");
    exit();

}

if ($_SESSION["role"] != "teacher") {

    die("Access denied.");

}

?>

<!DOCTYPE html>
<html>
<head>
    <title>Teacher Area</title>
</head>
<body>

<h1>Teacher Area</h1>

<p>Welcome,
<?php echo $_SESSION["username"]; ?>
</p>

</body>
</html>
```

Save the file.

---

## Add a Teacher Link

Add the following code to your navigation menu:

```php
<?php if ($_SESSION["role"] == "teacher") { ?>

<li>
    <a href="teacher.php">
        Teacher Area
    </a>
</li>

<?php } ?>
```

Only teachers will see this link.

---

## Create a Student Page

Create a new file called:

```text
student.php
```

Add:

```php
<?php

session_start();

if (!isset($_SESSION["user_id"])) {

    header("Location: login.php");
    exit();

}

if ($_SESSION["role"] != "student") {

    die("Access denied.");

}

?>

<!DOCTYPE html>
<html>
<head>
    <title>Student Area</title>
</head>
<body>

<h1>Student Area</h1>

<p>Welcome,
<?php echo $_SESSION["username"]; ?>
</p>

</body>
</html>
```

Save the file.

---

## Add a Student Link

Add:

```php
<?php if ($_SESSION["role"] == "student") { ?>

<li>
    <a href="student.php">
        Student Area
    </a>
</li>

<?php } ?>
```

Only students will see this link.

---

## Add a Logout Link

Add:

```php
<li>
    <a href="logout.php">
        Logout
    </a>
</li>
```

This link should be visible to all logged-in users.

---

## Complete Navigation Menu

Your completed navigation menu should look like:

```php
<h2>Navigation</h2>

<ul>

    <li>
        <a href="members.php">
            Home
        </a>
    </li>

    <?php if ($_SESSION["role"] == "admin") { ?>

    <li>
        <a href="admin.php">
            Admin Area
        </a>
    </li>

    <?php } ?>

    <?php if ($_SESSION["role"] == "teacher") { ?>

    <li>
        <a href="teacher.php">
            Teacher Area
        </a>
    </li>

    <?php } ?>

    <?php if ($_SESSION["role"] == "student") { ?>

    <li>
        <a href="student.php">
            Student Area
        </a>
    </li>

    <?php } ?>

    <li>
        <a href="logout.php">
            Logout
        </a>
    </li>

</ul>
```

---

## Test as an Administrator

Log in as:

```text
admin
```

You should see:

```text
Home
Admin Area
Logout
```


## Test as a Teacher

Log in as:

```text
teacher
```

You should see:

```text
Home
Teacher Area
Logout
```


## Test as a Student

Log in as:

```text
student
```

You should see:

```text
Home
Student Area
Logout
```


## Prevent Direct Access

The navigation menu improves the user experience, but it does not secure the pages.

The following checks should still exist in:

```text
admin.php
teacher.php
student.php
```

Example:

```php
if ($_SESSION["role"] != "admin") {

    die("Access denied.");

}
```

This prevents users from manually typing the page URL into their browser.

---

## Next Steps

You now have:

* User registration
* Password hashing
* Login system
* Sessions
* Protected pages
* Logout functionality
* Role-based access control
* Dynamic navigation menus